Payroll Control
The Payroll Control page is organized into a step-by-step checklist. This page contains the sections used for the input, balancing and submission of payroll.
Step 1 – Confirm Payroll Defaults
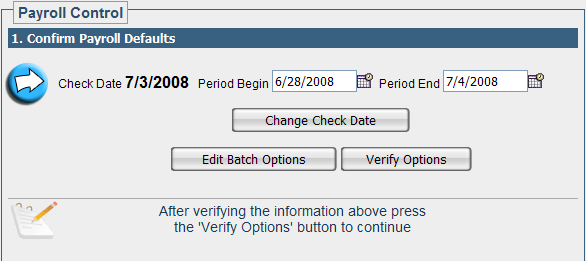
A. Before starting the payroll, first make sure that the check, period begin and period end dates are correct.
B. If desired, click the Edit Batch Options button to view and change the settings that will be used when payroll is started to create the default batch or batches. The picture below shows the settings that can be changed for a batch. When checks are created in this batch, they will be initialized with the period begin, period end and check type that are set here. The Apply Base Auto Pay box controls whether or not employees marked to auto pay ‘Salary’ or ‘Hours’ will be paid automatically when the batch is started. The Post EE Auto Pays box controls whether or not items from the employee auto pay screen will be posted automatically onto employees’ paychecks.

Once satisfied with the settings in Step 1, click the Verify Options button to proceed to the next step.
Step 2 – Start Payroll Batch(es)

Press Start Payroll Now to create the batch or batches that are scheduled for the current payroll. In the event that no batches are scheduled, it is possible to add them after starting payroll. In the event that the payroll is started with incorrect batch options set, it is possible to change the batch options and restart the entire payroll or just the affected batch or batches after starting payroll.
Once the payroll has been started, the options to Add New Batch and Restart Payroll appear.

A. Pressing Add New Batch brings up the Create New Batch page. Please see the help topic for Create New Batch for assistance setting up a new batch with the appropriate settings.
B. The Restart Payroll button is provided to allow you to quickly delete everything and start over. When clicked, a confirmation box appears warning that you are about to delete everything and start over.
Step 3 – Enter and Confirm Payroll Data
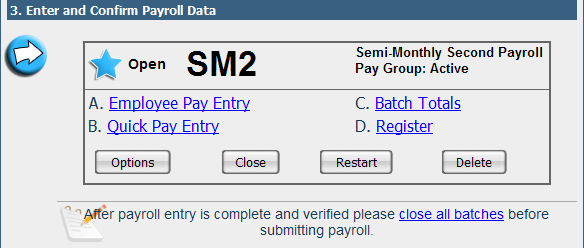
This section shows all batches scheduled for the current payroll. It acts as a switchboard where you can enter and confirm payroll information.
A. Employee Pay Entry – Click on this to view and edit paycheck information at the employee level. Please see the help topic for Employee Pay Entry for assistance with this feature.
B. Quick Pay Entry – Click on this to view and edit amounts and hours for multiple employees at the same time. Please see the help topic for Quick Pay Entry for assistance with this feature.
C. Batch Totals – Click on this to view the total hours and amounts allotted to each pay code. Use the filtering section at the bottom to limit your totals to a particular location and/or department. Please see the help topic for Batch Totals for assistance with this feature.
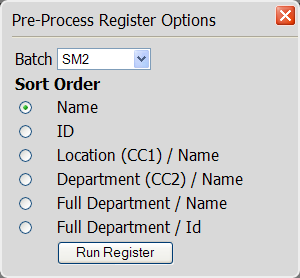
D. Register – Click this to audit the payroll data in your batch prior to submitting it. Choose the batch and the sort order you would like, and then click the Run Register button. Once the Status shows as Done, click the Download link to view, print and/or save it; click the e-Mail link to send it via e-Mail.
1. Options – Allows editing of the batch period dates and attributes. Please refer to the help topic Edit Batch Options for more information.
2. Close – Closes the current batch to signify that editing is complete. All batches must be closed before submitting payroll.
3. Re-Open – Re-opens the current batch for further editing.
4. Restart – Restarts the current batch, effectively erasing any data entered. Note that this cannot be undone; therefore, any checks in the batch will be deleted.
5. Delete – Deletes the current batch and all checks in it.
Payroll Rules
The system is capable of providing automatic warnings that you configure on the Payroll Rules page. When you close all the batches in a payroll this triggers the system to pre-calculate and search the payroll for any checks or employees who fall out of the defined Payroll Rules.

When the system finishes calculating it displays the result of these data validation checks before the Submit Payroll section.

For more information on the available payroll rules and setting up these rules please see the help topic Payroll Rules.
Step 4 – Submit Payroll

When you have completed Steps 1 through 3, click the Submit button to transmit your payroll to Alliance Payroll Services for processing. Once submitted, the payroll is no longer editable.